- Author Lauren Nevill [email protected].
- Public 2024-01-11 01:04.
- Last modified 2025-01-23 15:15.
Typically, creating a calculator widget for a website requires a paid programmer and a technical support budget. Recently, however, at least three options have appeared on how to save time and money on creating and maintaining a calculator: let's start with the simplest and most affordable - a free calculator builder that will help you assemble a calculator in a visual mode - as when filling out a profile on a social network.

It is necessary
Laptop or computer, any browser, 10-30 minutes of time, mailbox or social network account (Facebook, Vkontakte, Google+, UID), plus an understanding of what your calculator should be like
Instructions
Step 1
To start assembling and in the future to manage your calculator, we register on the uCalc.pro service via mail or one of the popular social networks.

Step 2
After registration, you will be taken to your personal account, where your calculators will be stored. Here you can choose a ready-made template, or start assembling the calculator from scratch.

Step 3
After choosing in favor of a template or self-assembly, a visual editor will open in front of you: by dragging items - a list, slider, checkmark, checkbox, contact fields or a button - from the column on the left, you can assemble a calculator.

Step 4
Hover over any element with the mouse and you will see settings icons - in them you can set sizes, make an element mandatory, set the names of fields for the list and change their places. And by clicking on the light green frame that appears around the element, you can rearrange it above or below the rest of the calculator's parts.

Step 5
You can change the color and size of the labels by simply highlighting the desired piece of text. It is better to add explanations to the texts: if we are talking about width, add "meters" or "mm", about prices "rubles", "rubles per meter" and so on.

Step 6
To change the background color or change the color of the slider and checkmark, use the icons above the calculator. The left icon is responsible for the background color - it is better to paint it in the colors of your website page. The middle icon is the colors of the elements: you can choose from 10 ready-made schemes.

Step 7
For clarity, you can add pictures to the calculator: an image can be added both to the header and to any of the calculator's elements. To do this, select the "Picture" icon from the left panel, drag it to the desired location, and then, by clicking on the element, upload the picture from your computer.

Step 8
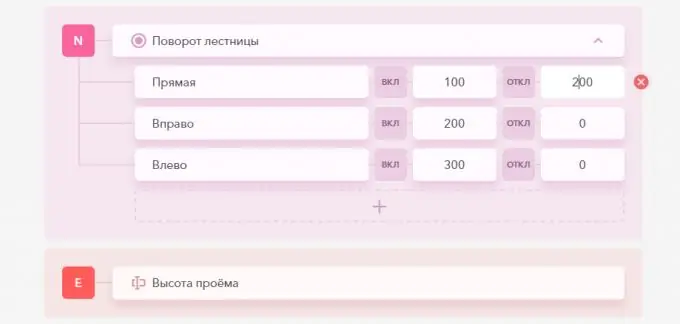
To specify the range of prices for services and any other numerical parameters, switch to the "Formula" tab. You will see a calculator diagram in which you can enter the values you need.

Step 9
Each element of the calculator on the diagram is assigned a letter. By substituting letters in the formula box on the left and adding mathematical signs, you can create one or more formulas: for example, if you need to give a price with or without a discount, make two formulas by adding multiplication by a number less than 1 in the second (for example, 0.8 will mean a discount in 20% and so on).

Step 10
If you want to receive customer requests by mail or SMS, return to the "Design" tab, click on the button of your calculator. You can specify in the settings. There you will also find the payment settings - if you want to accept prepayment via Yandex. Checkout.

Step 11
To send the client the result of the calculation or other information (promo code, link, message "Order accepted"), click "Notify client" in the button settings and fill in the letter template. To collect customer contacts, add the "field" element to the calculator and specify "email", "phone number" and so on in the settings.

Step 12
So, the calculator is ready. To put it on the site, click the "Save" button in the right corner - and a window with a ready-made widget code will appear in front of you. Copy the code and paste it into a new or existing page on the site.

Step 13
If you are not confident in your abilities, use the ready-made instructions for adding a calculator. The uCalc website has illustrated tips for installing a calculator on CMS Wordpress, Joomla, Drupal, NetCat, site builders uKit, uCoz, Tilda and Wix and other well-known platforms. If you did not find your platform in the list, open any description and follow the analogy.

Step 14
If you decide to change anything after installation on the site (design, prices, number of elements, etc.), the calculator you have created can be edited in the constructor - and resave it. The changes made will be automatically displayed on the site.


