- Author Lauren Nevill nevill@internetdaybook.com.
- Public 2023-12-16 18:48.
- Last modified 2025-01-23 15:15.
Microsoft Paint is a program for creating drawings as well as editing existing images. In addition to the ability to paste a picture from the clipboard, resize and rotate it, this graphics editor is equipped with many tools for drawing and adjusting.

Instructions
Step 1
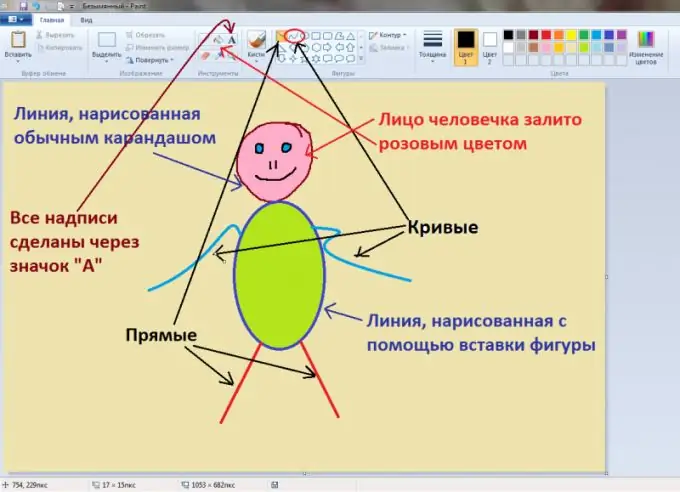
The main tool is a pencil. It, like its physical counterpart, allows you to draw arbitrary lines and draw any silhouettes. The thickness is set in the appropriate column, and the default color is black, but can be changed to any other using the color palette. In order to start working with a pencil (although when you open the Paint file, it is already ready for drawing), on the top panel, you must click the corresponding icon.
Step 2
To the right of the pencil is the fill. It allows you to fill any closed shape with color, but if there is a gap in the latter, the fill will spread over the entire drawing or a wider area bounded by a line. Its shade also changes with a color palette. Next is the function of inserting text, indicated by the letter "A". When you click it and select an area on the image, an additional panel appears, where you can select the font of the inscription, its size and color.
Step 3
The line below contains three more tools: an eraser, an eyedropper, and a magnifying glass. The first is necessary to remove a part of the picture. Its size can be changed in the "Thickness" column. An eyedropper is needed to copy a color from an image if it is not in the standard list. A magnifying glass is needed for scaling when you have to change the smallest detail of the picture. To do this, by clicking on the corresponding icon, the user gets in the drawing area a small magnifying glass in a rectangular area. By hovering it over the desired object and pressing the left mouse button, it will enlarge part of the image.
Step 4
Brushes are similar to a pencil, but the line they draw is not uniform and can have a different structure. For example, if you select an oil brush, your strokes will resemble the original strokes made on a real canvas. The picture made with this tool will not look like a two-dimensional drawing, but like a three-dimensional, multi-textured image.
Step 5
Further on the right is the window for inserting ready-made shapes. This includes both geometrically correct objects: a square, a circle, a star, an arrow - and an arbitrarily stretched line. She is the second in a row. To get a curve, you need to left-click on the corresponding icon, then draw a line in the figure. It will be straight at first. Having "hooked" the pointer to a point inside it, it should be dragged to the side and curved the line. To insert a regular shape, you need to place the cursor anywhere, press the left mouse button and, without releasing it, move it a little.
Step 6
The last tool is the choice of color, which can be carried out among the proposed standard tones or make your own by clicking on the "Change colors" button. In the window that appears, you can get a new shade by moving the cursor, similar to a crosshair, over the rainbow area, or by setting new parameters in the corresponding fields.


