- Author Lauren Nevill [email protected].
- Public 2023-12-16 18:48.
- Last modified 2025-01-23 15:15.
Everything that the web surfer sees on the pages of the site is rendered for him by the browser based on the detailed information sent by the web server. This information is called the html-code of the page and is composed of separate instructions - "tags", which describe the appearance and location of each individual element. To add a new element (for example, a picture) to a site page, you need to place a corresponding instruction (tag) in its source code.

Instructions
Step 1
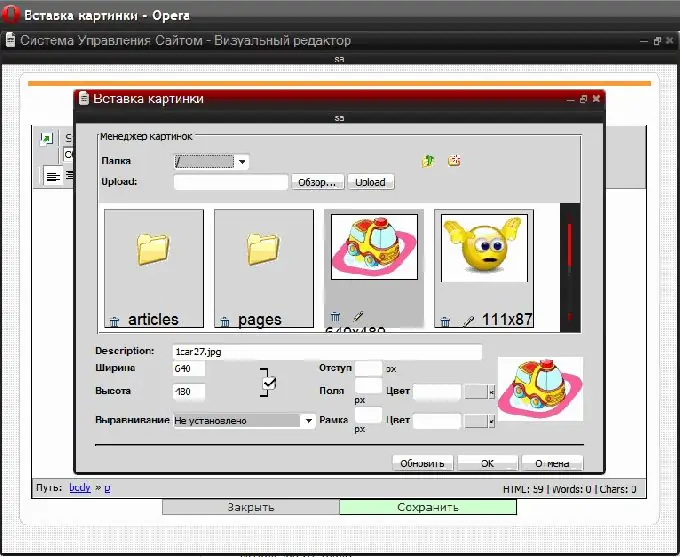
Add a picture to the page using the page editor, if you have the opportunity to use the content management system. First, load the desired page into the editor and make sure the visual editing mode is enabled. It is sometimes called the English acronym WYSIWYG (What You See Is What You Get). In visual mode, the page looks the same as on the site. You need to click with the mouse the place where you need to insert the picture and press the button "insert image" on the editor panel.
Step 2
Select a picture from the list already available on the server, which will open the visual editor for you in the dialog for inserting images. If you have not yet downloaded it, then click the search button for the desired file on your computer ("Browse"), find and open it, and then click the "Upload" (or "Download") button. At the end of the process of uploading the file to the server, the picture will be added to the list, and you can select it as well.
Step 3
Specify the width and color of the frame around the picture, the fill color and distance between the frame and the image, the text of the pop-up tooltip on hover. It does not hurt to specify the size of the picture, although this, like all settings in this dialog (except for selecting a picture), is optional. After filling in all the required fields of the dialog, click the "OK" button. This completes the procedure for inserting the picture, all that remains is to save the edited page.
Step 4
If you cannot use the page editor of the control system or it does not have a visual editing mode, then you need to compose and add the required HTML tag to the source code. The simplest option might look like this: Here img is the name of the tag, and the browser uses it to conclude that a picture should be displayed here. The src attribute contains the address and name of the image file. If the file is placed in the same folder as the page, then the full URL is not required. You can add a pop-up tooltip on hover using the title attribute, and the border width can be specified in the border attribute: Replace the required attributes with your values and paste the resulting HTML-code of the tag into the page source. This can be done in a simple text editor by downloading the source from your site's server and then uploading it back.
Step 5
Upload the image file to the site. This can be done using the file manager of the control system or the panel of the hosting provider, or you can use the resident program - FTP client. The first option is easier, since it does not require installation and adjustment of the program - the file manager works directly in the browser.


