- Author Lauren Nevill nevill@internetdaybook.com.
- Public 2023-12-16 18:48.
- Last modified 2025-01-23 15:15.
The benefits of a wireless network are undeniable. You are not tied to any specific workplace, and you can go online from anywhere in your apartment, office, shopping center, etc., where there is a network coverage area. It is convenient and can greatly simplify the work of any organization. Our instructions will help you set up a wireless network yourself.

Instructions
Step 1
Find the Network Neighborhood icon on your desktop. If this icon is not on the desktop, go to the Start menu // Settings // Network Connections. Then right-click on the Network Neighborhood icon. A drop-down menu will appear, in which you need to select the item Properties.
Step 2
In the opened window "Network connections, right-click on the icon" Wireless network connection. A drop-down menu will appear, select “Enable.
Step 3
Next, in the “Network Connections” window, right-click again on the “Wireless Network Connection” icon, in the menu, click “Properties.
Step 4
Check the settings under the General tab. The checkboxes should be on the buttons "When connected, display the icon in the notification area and" Notify when there is a limited or no connection.
Step 5
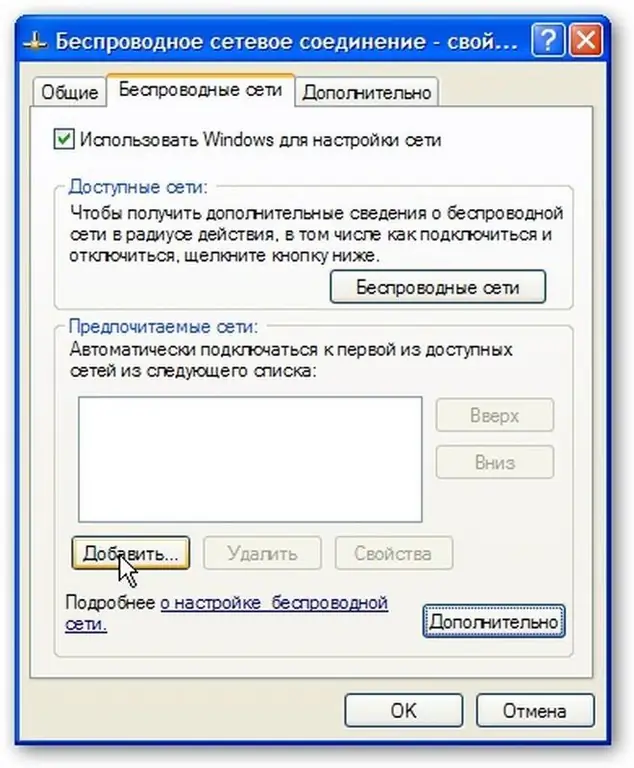
Find and select the "Wireless Networks" tab in the "Wireless Network Connection -" Properties
If you did not find such a tab there, then in the window "Wireless network connection -" Properties you need to click "OK. In the" Start menu, click the "Settings" button, then the "Control Panel" button.
In the Control Panel window that opens, double-click the Administrative Tools icon, double-click the Services icon. Make sure that the Wireless Zero Configuration service is in the Running state. If not, then double-click on "Wireless Zero Configuration, in the service properties window that appears, click the" Start "button and" OK. In the "Network connections" window, right-click on the "Wireless network connection" icon, select "Properties. Find the Wireless & Networks tab and make sure the Use Windows to configure network checkbox is checked.
Step 6
In the Preferred Networks field, click the Add button. On the "Connections" tab, in the "Network name (SSID) field, type MIAN (Attention! All letters must be capitalized)." Check the box “Connect even if the network is not broadcasting. In the Authentication section, select WPA from the menu. On the Data Encryption tab, select TKIP from the pop-up menu. Make sure there is a check mark on the button "This is a direct computer-to-computer connection, and there is no check mark on" Access points not used.
Step 7
In the "Wireless Properties" window, select the "Authentication" tab. In the EAP Type section, select Protected EAP (PEAP) from the pop-up menu. Uncheck the box next to Authenticate like a computer when computer information is available. Make sure the checkbox is unchecked on the Authenticate as guest when no computer or user information is available. Click the Properties button.
Step 8
In the Protected EAP Properties window, uncheck the Verify Server Certificate button. Make sure that the section “Selecting an authentication method” is exactly “Secured password (EAPMSCHAP v2). Check the box next to Enable Fast Reconnect.
Step 9
Click the Configure button. In the EAP MSCHAPv2 Properties window, uncheck the Automatically use Windows login and password button. Now click the OK button.
Step 10
Click OK on the Protected EAP Properties window. In the Wireless Properties dialog box, select the Connection tab. Make sure to check the box next to Connect if the network is within range. After that click “OK.
Step 11
Click the OK button in the “Wireless network connection - properties” window, the connection is now configured.


