- Author Lauren Nevill [email protected].
- Public 2024-01-11 01:04.
- Last modified 2025-01-23 15:15.
It is tempting to create a blog on the Internet, but many are afraid of the difficulties. While this may seem confusing at first glance, the reality is much simpler. Even a person who is far from the HTML language will be able to make his site if he follows the step-by-step instructions.

It is necessary
- - domain;
- - hosting;
- - WordPress.
Instructions
Step 1
Before starting a blog on the Internet, you need to come up with a name for it and buy a suitable domain. Of course, there are free sites like Livejournal, Liveinternet, Blogpost, Ucoz, etc. But I advise you to take the creation of a blog more seriously, because you can even make good money on it. Therefore, you need to buy a beautiful domain and choose a hosting.

Step 2
Go to the website of one of the domain registrars. There are a lot of them, you can choose the most suitable one. On it, you will definitely find a search service for free domains, you just need to enter the invented name in the line, select the zone ru, com, net or another and click on the check button. If the domain is free, then register it according to the prompts on the site.

Step 3
Now you need to buy hosting, where the blog will be created. Hosting prices vary quite a bit depending on the services they provide, so you'd better take a closer look at this point. Pay attention to the reviews about the site, ask the webmasters' forums which hosting is better to buy.

Step 4
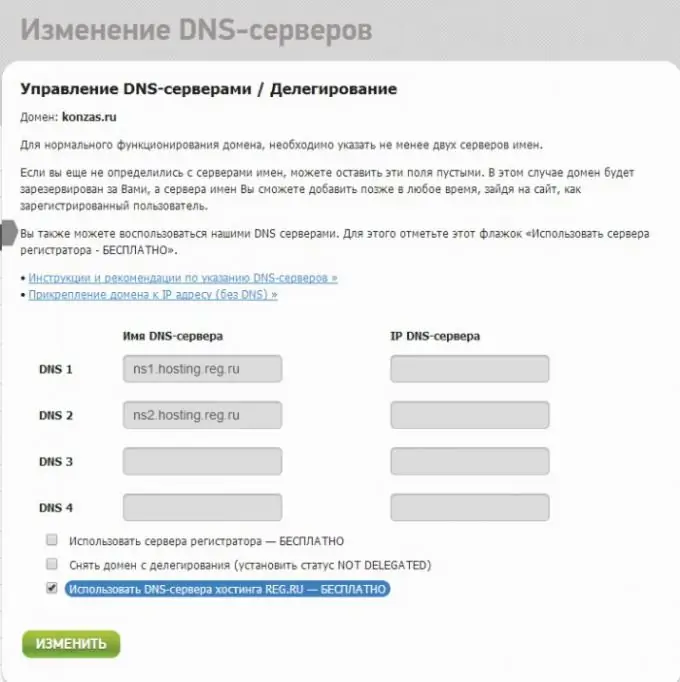
Next, you need to host your blog on the internet. To do this, first link the domain to the hosting, so register the DNS servers. It is not difficult, you need to go to the control panel of the domain registrar and enter the DNS data that will be sent to you after purchasing the hosting to your email address. Now it remains to wait up to 48 hours until the update of the new data from the providers takes place. If you enter the name of the blog in the browser and your host's splash screen opens, then the update has been made and you can continue to blog.

Step 5
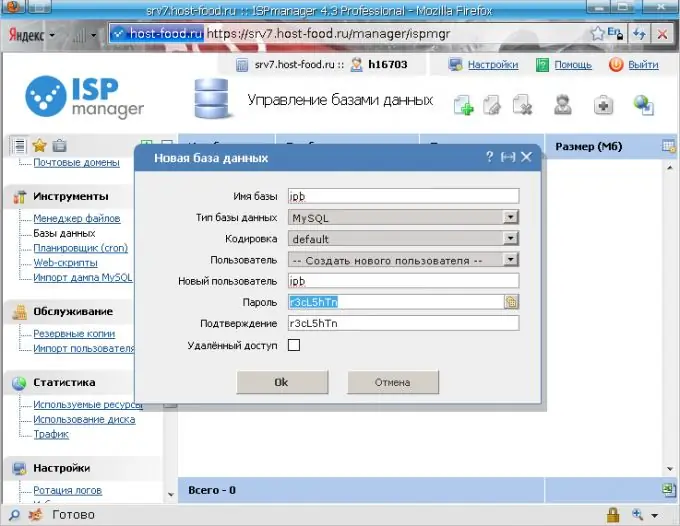
Log into the panel of the purchased hosting. Create a MySQL database for your blog, give it a username and password. This is also not difficult even for a beginner. On the hosting panel, you can easily find the Create New Database menu. Then fill in all the fields and click "Save".

Step 6
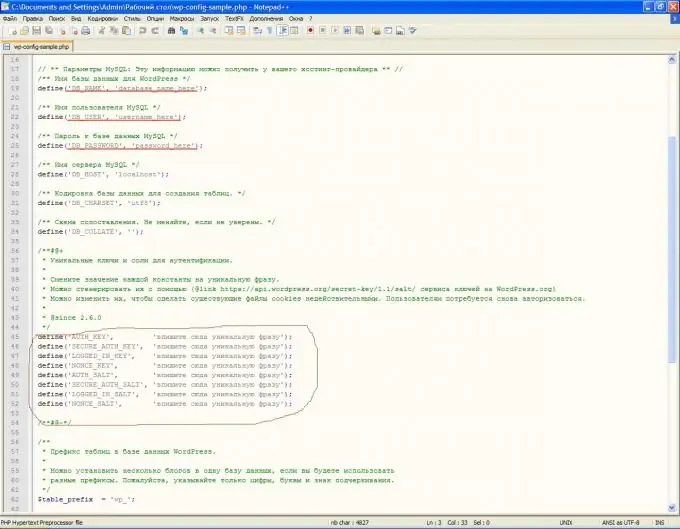
To further create a website (blog) for hosting, download the WordPress engine, for beginners it is very convenient and understandable. Download the WordPress distribution from the official site, unpack it on your desktop, find the config-sample.php file. Rename it by removing "-sample". Open this file in an html editor, I use NotePad ++, enter the password and username, save and zip it again. Then upload it to the hosting in the root folder of the site (blog). Please note that in this folder the archive must be unpacked, and then the zip file must be deleted.

Step 7
There is only one step left before creating a blog. Enter https:// your blog / wp-admin / install.php into the search bar of your browser, substitute the domain name instead of the phrase “your blog”. Hit Enter. You will be taken to the WordPress installation page. fill in all fields, enter your username and password. Click Install WordPress. That's all. Then you can go to the admin panel of the site (blog) using this login and password, download a beautiful template and start writing articles.


