- Author Lauren Nevill nevill@internetdaybook.com.
- Public 2024-01-11 01:05.
- Last modified 2025-01-23 15:15.
The majority of visitors to the ok.ru site sooner or later ask themselves the question "How to create a group in classmates?"

Necessary
an account on the Odnoklassniki social network
Instructions
Step 1
Log in to the Odnoklassniki website under your account or under the account under which you are going to create a group. In the future, this account will become the administrator of this group. In the menu to the right of the photo, click "Groups"

Step 2
On the page that opens, in the left column, find the "Create a group or event" button right under your avatar and name. Click on the button to start creating the group.

Step 3
Select the type of group you are creating. Choose "By Interest" - if your group is created to communicate visitors by interest, exchange information, and so on. "For business" - choose this option if your group will be associated with your business, ie. you intend to attract customers with its help. "Event" - Suitable for posting information about an upcoming event, such as a concert or birthday that you are hosting.

Step 4
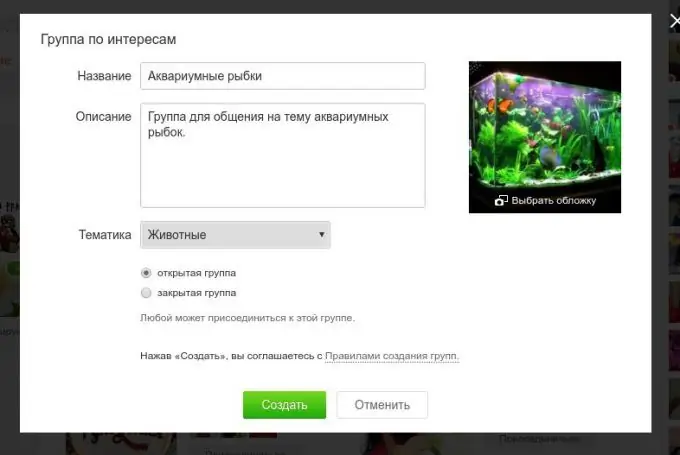
Fill out a short form describing the group. Group Name - Enter a meaningful, meaningful name for the group. 2-3 words are enough. Description - enter an extended description of the group, tell us in more detail on what topics you are going to communicate in this group. Topic - select the topic of the group for the catalog of groups of the social network "Classmates". Click on the "Select Cover" link and upload a small but informative image that captures the essence of your band. Select an open group if you want everyone to be able to join it without your consent. Select a private group if you want to limit the circle of group members. When all the fields are filled in, click the create button.

Step 5
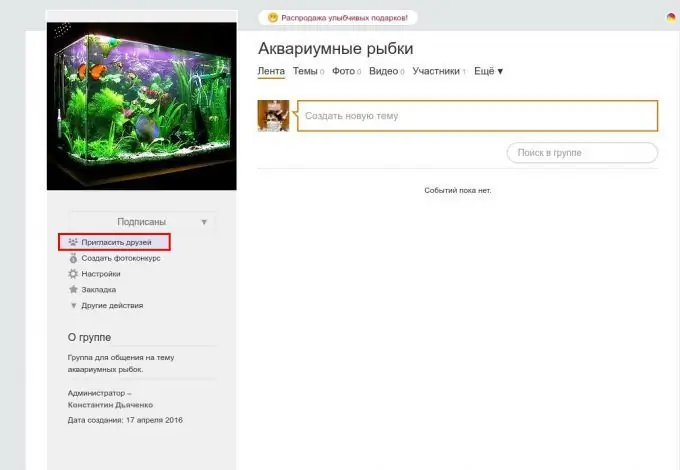
Congratulations! Your group has been created, you can invite friends to it, add messages and photos. To invite friends, click on the "Invite Friends" link under the group's avatar.

Step 6
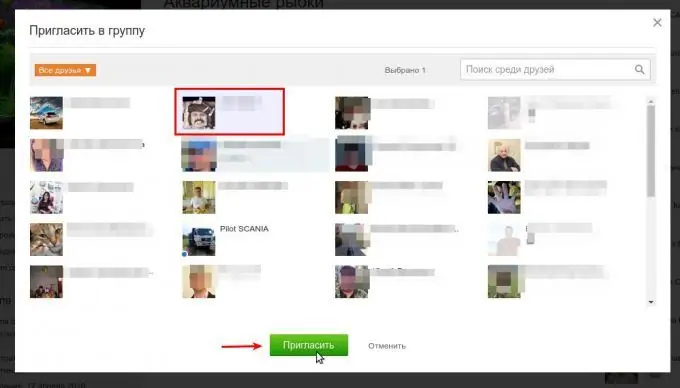
In the window that opens, select the desired friends and click the "Invite" button. Your friends will receive invitations to the group, and if they like the group, they will join it.

Step 7
As a group administrator, you can post messages on behalf of the group. Such messages will be seen by all participants in the event feed. To write a message on behalf of the group, click in the "Create a new topic" field. Then, in the opened window, click on the icon with your avatar in the lower left corner and select the group.

Step 8
Now you can compose a message, write a text, attach a photo, music or poll. After you click the "Share" button, the message will be published and all members of the group will see it in the news feed on the Odnoklassniki website.


