- Author Lauren Nevill nevill@internetdaybook.com.
- Public 2023-12-16 18:48.
- Last modified 2025-01-23 15:15.
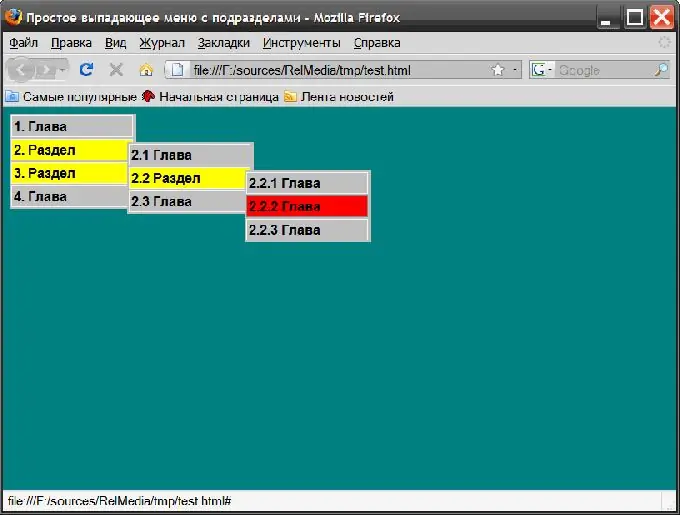
A menu with drop-down submenu sections is used in site layout in order to more clearly present the structure of sections and subsections, while saving page space. It is not so difficult to implement such a mechanism: one of the implementation examples is given in the article.

Instructions
Step 1
Below is the complete source code of the page. Descriptions of styles are placed directly in the text of the page. Neither the html nor the css of this variant of the menu implementation contains any complex constructions that need a detailed explanation.
Step 2
<! DOCTYPE html PUBLIC "- // W3C // DTD XHTML 1.0 Transitional // EN"
"https://www.w3.org/TR/xhtml1/DTD/xhtml1-transitional.dtd">
Simple dropdown menu with subsections
* {
font-family: arial;
font-size: 16px;
}
/ * for older IE browsers * /
body {behavior: url ("csshover.htc");}
ul, li, a {
display: block;
margin: 0;
padding: 0;
border: 0;
}
ul {
width: 150px;
border: 1px solid silver;
background: white;
list-style: none;
}
li {
position: relative;
padding: 1px;
background-color: silver;
z-index: 9;
}
li.folder {background-color: silver;}
li.folder ul {
position: absolute;
left: 111px; / * IE only * /
top: 5px;
}
li.folder> ul {left: 140px;} / * for others * /
a {
padding: 2px;
border: 1px solid white;
text-decoration: none;
color: Black;
font-weight: bold;
width: 100%; / * for IE * /
}
li> a {width: auto;} / * for others * /
li a {
display: block;
width: 140px;
}
li a.submenu {
background-color: yellow;
}
/ * Chapters * /
a: hover {
border-color: gray;
background-color: red;
color: black;
}
li.folder a: hover {
background-color: red;
}
/ * Sections * /
li.folder: hover {z-index: 10;}
ul ul, li: hover ul ul {display: none;}
li: hover ul, li: hover li: hover ul {display: block;}
- 1. Chapter
-
2. Section
- 2.1 Chapter
-
2.2 Section
- 2.2.1 Chapter
- 2.2.2 Chapter
- 2.2.3 Chapter
- 2.3 Chapter
-
3. Section
- 3.1 Chapter
- 3.2 Chapter
- 3.3 Chapter
- 4. Chapter

Step 3
If you want to use the option to support outdated browser modifications, then an additional line should be added to the style description block (immediately after) (you can omit the comment):
/ * for older IE browsers * /
body {behavior: url ("csshover.htc");}
Step 4
Then create a separate page, the content of which is shown below.
window. CSSHover = (function () {var m = / (^ | / s) ((([^ a] ([^] +)?) | (a ([^ #.] [^] +) +)):(hover | active | focus)) / i; var n = / (. *?):(hover | active | focus) / i; var o = / [^:] +: ([az / -] +). * / i; var p = / (. ([a-z0-9 _ / -] +): [az] +) | (: [az] +) / gi; var q = / \. ([a-z0-9 _ / -] * on (hover | active | focus)) / i; var s = / msie (5 | 6 | 7) / i; var t = / backcompat / i; var u = {index: 0, list: ['text-kashida', 'text-kashida-space', 'text-justify'], get: function () {return this.list [(this.index ++)% this.list.length] }}; var v = function (c) {return c.replace (/-(.)/ mg, function (a, b) {return b.toUpperCase ()})}; var w = {elements: , callbacks: {}, init: function () {if (! s.test (navigator.userAgent) &&! t.test (window.document.compatMode)) {return} var a = window.document.styleSheets, l = a.length; for (var i = 0; i <l; i ++) {this.parseStylesheet (a )}}, parseStylesheet: function (a) {if (a.imports) {try {var b = a. imports; var l = b.length; for (var i = 0; i <l; i ++) {this.parseStylesheet (a.imports )}} catch (securityException) {}} try {var c = a. rules; var r = c.length; for (var j = 0; j <r; j ++) {this.parseCSSRule (c [j], a)}} ca tch (someException) {}}, parseCSSRule: function (a, b) {var c = a.selectorText; if (m.test (c)) {var d = a.style.cssText; var e = n.exec (c) [1]; var f = c.replace (o, 'on $ 1'); var g = c.replace (p, '. $ 2' + f); var h = q.exec (g) [1]; var i = e + h; if (! this.callbacks ) {var j = u.get (); var k = v (j); b.addRule (e, j + ': expression (CSSHover (this, "'+ f +'", "'+ h +'", "'+ k +'")) '); this.callbacks = true} b.addRule (g, d)}}, patch: function (a, b, c, d) {try {var f = a.parentNode.currentStyle [d]; a.style [d] = f} catch (e) {a.runtimeStyle [d] = ''} if (! a.csshover) {a.csshover = } if (! a.csshover [c]) {a.csshover [c] = true; var g = new CSSHoverElement (a, b, c); this.elements.push (g)} return b}, unload: function () {try {var l = this.elements.length; for (var i = 0; i <l; i ++) {this.elements .unload ()} this.elements =; this.callbacks = {}} catch (e) {}}}; var x = {onhover: {activator: 'onmouseenter', deactivator: 'onmouseleave'}, onactive: {activator: 'onmousedown ', deactivator:' onmouseup '}, onfocus: {activator:' onfocus', deactivator: 'onblur'}}; function CSSHoverElement (a, b, c) {this.node = a; this.t ype = b; var d = new RegExp ('(^ | / s)' + c + '(s | $)', 'g');
this.activator = function () {a.className + = '' + c}; this.deactivator = function () {a.className = a.className.replace (d, '')}; a.attachEvent (x .activator, this.activator); a.attachEvent (x .deactivator, this.deactivator)} CSSHoverElement.prototype = {unload: function () {this.node.detachEvent (x [this.type].activator, this.activator); this.node.detachEvent (x [this.type].deactivator, this.deactivator); this.activator = null; this.deactivator = null; this.node = null; this.type = null} }; window.attachEvent ('onbeforeunload', function () {w.unload ()}); return function (a, b, c, d) {if (a) {return w.patch (a, b, c, d)} else {w.init ()}}}) ();
Step 5
This page should be saved with the name csshover.htc and placed in the same place as the main page.


